Showing posts with label diy tutorial. Show all posts

Friday, March 27, 2015

Quick and Easy Pinwheels


One morning, I was getting together with some friends, and I realized that I was supposed to bring an appetizer. Oh what to do?! I had some tortillas, cheese, salami and veggies in the frig. I wondered what I could make with those ingredients. A really easy and delicious pinwheel snack!


First I spread cream cheese onto a tortilla, and then topped it with salami slices. Baby spinach and blanched asparagus made up the veggie component. Chunks of mozzarella added a creamy texture. I rolled it up, secured it with toothpicks, and sliced it into pinwheels.


An easy, quick-to-prepare, snazzy-looking appetizer or late-afternoon snack.

Friday, March 13, 2015

Fruit Wrap Tutorial

Yesterday, I posted on how to make a veggie wrap. Today's post is all about a delicious fruit-filled wrap!

First of all, here are the ingredients with which I began - bananas, whole wheat tortillas and peanut butter. I spread a thin layer of peanut butter onto the tortilla, all the way to one edge - that will be the sticky edge that seals the wrap shut.


Next, I sliced up a banana. I did a bias-cut (which basically means a diagonal cut), because I think it looks fancy. However, any type of slice will work.


After laying the banana slices down the middle of the tortilla, I decided that I wanted some more color and flavor, so I added a few craisins. Same as with the veggie wrap, I simply rolled up the tortilla towards the peanut-butter-filled edge. Securing it with two food picks, I cut the wrap on the bias.


Now, if you'll excuse me ... this banana-craisin-peanut-buttery goodness is calling my name. Happy eating!

Thursday, March 12, 2015

Veggie Wrap Tutorial

Today, I am going to demonstrate how to make a veggie wrap. Honestly, it's not hard. And the beauty of the wrap is that you can customize it based on (1) what you have on hand and (2) what veggies you like!


This picture represents the veggies that I had on hand - snap peas, carrot sticks and thinly sliced cucumbers. To make the wrap, I had whipped cream cheese and flour tortillas. (Also pictured: whole-wheat tortillas, peanut butter and bananas. These items are for a fruit-filled wrap, which I will feature in tomorrow's post.)


First, I spread a thin layer of whipped cream cheese on my tortilla. I prefer the whipped kind for this food adventure since it spreads better than the regular block cream cheese.


Next, I laid a few cucumber slices down the middle of the tortilla.


I topped the cucumber slices with carrot sticks and snap peas. So colorful!


Then I just rolled it up. I spread a bit more cream cheese on the edge of the tortilla to enable it to "seal shut". Two flower toothpicks held the wrap closed, while I cut in half.


Tada! Colorful, healthy lunch (or snack)!

Thursday, January 29, 2015

How-To: Make a #12 from Jicama

Today, I'll show you how to make Seattle's famous #12 out of jicama. But perhaps, you're not a Seahawks fan ... okay, then you can still use this simple way to liven up your kid's lunch.
If your favorite team has a special number, then use that. Or incorporate the jersey number of your child's favorite player.

Basically, you need a cutting board, a paring knife, a sharp knife and cookie cutters. Plus a jicama, at least in my case.


Put down the cutting board on the counter, of course. With the sharp knife, slice the jicama in half; it's easier to work with this way.

Using the paring knife, peel the brown skin off of the jicama. You'll also want to make a second pass to peel away the fibrous white part, as it's a bit bitter.

Next, with the sharp knife, carefully cut 1/4-1/2" slices of jicama.

Once you have an even slice, put your cookie cutters (in my case - #12) on top, and firmly press down.

Tada! Veggie numbers. Told you it wasn't hard. And by the way, I don't waste the jicama scraps. Those get packed in tomorrow's lunch. :)

So ... this is an easy, quick way to jazz up your kid's lunch. Try it today!


Thursday, September 25, 2014

Ultrasound Reveal and DIY Pics of "Baby Bee" Bento

On Monday, I showed you the lunch I made for the kiddos on Ultrasound Day. They were convinced that it was a girl. And they were right ... it's a GIRL!

We surprised them with pink donuts from TopPot (a local donut shop). "Pink" because that is how we told them "it's a girl!". Donuts because it was a celebration, and donuts are a very rare treat.


Here is how I made this "guess-the-gender" lunch.


I began with the following ingredients:
Hard-boiled eggs (not pictured)
"Blue for a boy" ingredients - blueberries and blue corn chips (Garden of Eatin' chips are DELICIOUS!)
"Pink for a girl" ingredients - red radishes and red bell peppers. (Naturally pink foods are rather difficult to come by, so I substituted red.)


After removing the shells, I rolled the peeled, hard-boiled eggs in yellow food-coloring, and then pat them dry with a paper towel.


Here's the dyed, hard-boiled eggs.


Once the eggs were patted dry, I added candy eyeballs and positioned a strip of nori (dried seaweed) as a bumblebee stripe.


One more nori stripe and sliced almonds as the wings, and the edible bumblebee is complete.


Moving on to packing the lunch: I began by placing several silicone baking cups in the lunch container as placeholders. I added blueberries to one blue silicone baking cup.


Red pepper strips filled in one side of the container.


Radishes fill in the space opposite the red peppers. And blue corn chips (so yummy!) get added to the other silicone baking cup.


Lastly, I placed the bumblebee egg in the small silicone cup in the center.
Now the "What Will Baby 'Bee'?" lunch is complete.


Wednesday, September 3, 2014

Back to School Bento

The day has finally arrived for our household ... I am sitting in my living room, writing this blog in peace and quiet ... the first day of school has arrived! And yes, of course, I sent my kiddos to school with an awesome lunch. This is a revisit to the one I made last year, but this time, I included a tutorial.


You might be thinking, "Great! But my kid started school a few days or weeks ago. I'm SO late to this cool lunch thing." My answer to that: Nope, you're not late at all. So you didn't present this lunch on the very first day of school. That's okay. Nothing is stopping you from surprising them with a funky lunch tomorrow or next week. Just think how surprised they would be! So follow along with my DIY lunch tutorial, get inspired and make a school-themed lunch soon.

 Here's what I started with:
A bag of Bugles.
White sandwich bread - we don't usually eat white sandwich bread, but in this case, it's necessary for the lunch.
Starbursts - must include at least 1 pink type in the bag.
Deli meat - or pbj.
An apple - for the stereotypical "apple for the teacher".
Veggies - not pictured.
Two-tone string cheese - technically, you just need the orange side, but I couldn't find any plain, rounded orange cheese sticks.


First to make the notebook paper sandwiches:
(1) & (2) Measure the size of your sandwich container. You don't want to make the sandwich and THEN have to cut it to fit.
(3) Cut the bread to size.
(4) Make sure the bread slice does indeed fit into said container, and that small fingers can reach in to grab it at lunchtime.


Next, creating the look of the notebook paper:
(1) I had to pull out a piece of notebook paper, to remember the direction of the blue lines vs. the direction of the red lines. :)
(2) Use a blue Wilton food-safe color markers (available at JoAnn's and Michaels, or online) to draw horizontal lines on the sandwich bread.
(3) Use the red marker to draw one red line down the left-hand side of the "notebook paper".
(4) I double-stacked two sandwiches in my kids' containers, so I made two "notebook paper" per child. 
(5) Not listed: fill the sandwiches with the desired filling. Today, I used ham and spinach.


For the pencil:
Lay out the cheese sticks. Pick the ones that are completely orange on one side. Since pencils are usually orange or dark yellow, we want the cheese stick to mimic that look.


To make the pencil eraser:
(1) From the Starburst bag, pick the lightest pink or red candies. I choose Watermelon and Strawberry.
(2) Unwrap the candy, and pull out a paring knife or apple corer.
(3) Center the apple corer over the Starburst, and push down through the candy. 
(4) Roll the Starburst circle on the cutting board to smooth out uneven edges.


To create the pencil:
(1) Gently push a toothpick into one one end of the cheese stick.
(2) Add Starburst eraser. I found it worked best to twist the Starburst onto the toothpick, rather than pushing it on.
(3) Using a paring knife, carve away a bit of the other end of the cheese stick, and add a toothpick.
(4) Gently place a Bugle onto the toothpick.


Using the black, Wilton food-safe marker, color the tip of the Bugle to resemble a sharpened pencil.


To assemble, simply place the notebook paper sandwiches into a lunchbox container, and place the cheese stick pencil on top. Add fruits and veggies of your choice to another container.


If you are a homeschooling parent or have toddlers and preschoolers at home, this lunch is easily adaptable to plate at the dining room table.


Happy lunching, and happy 1st day of school!

Thursday, August 21, 2014

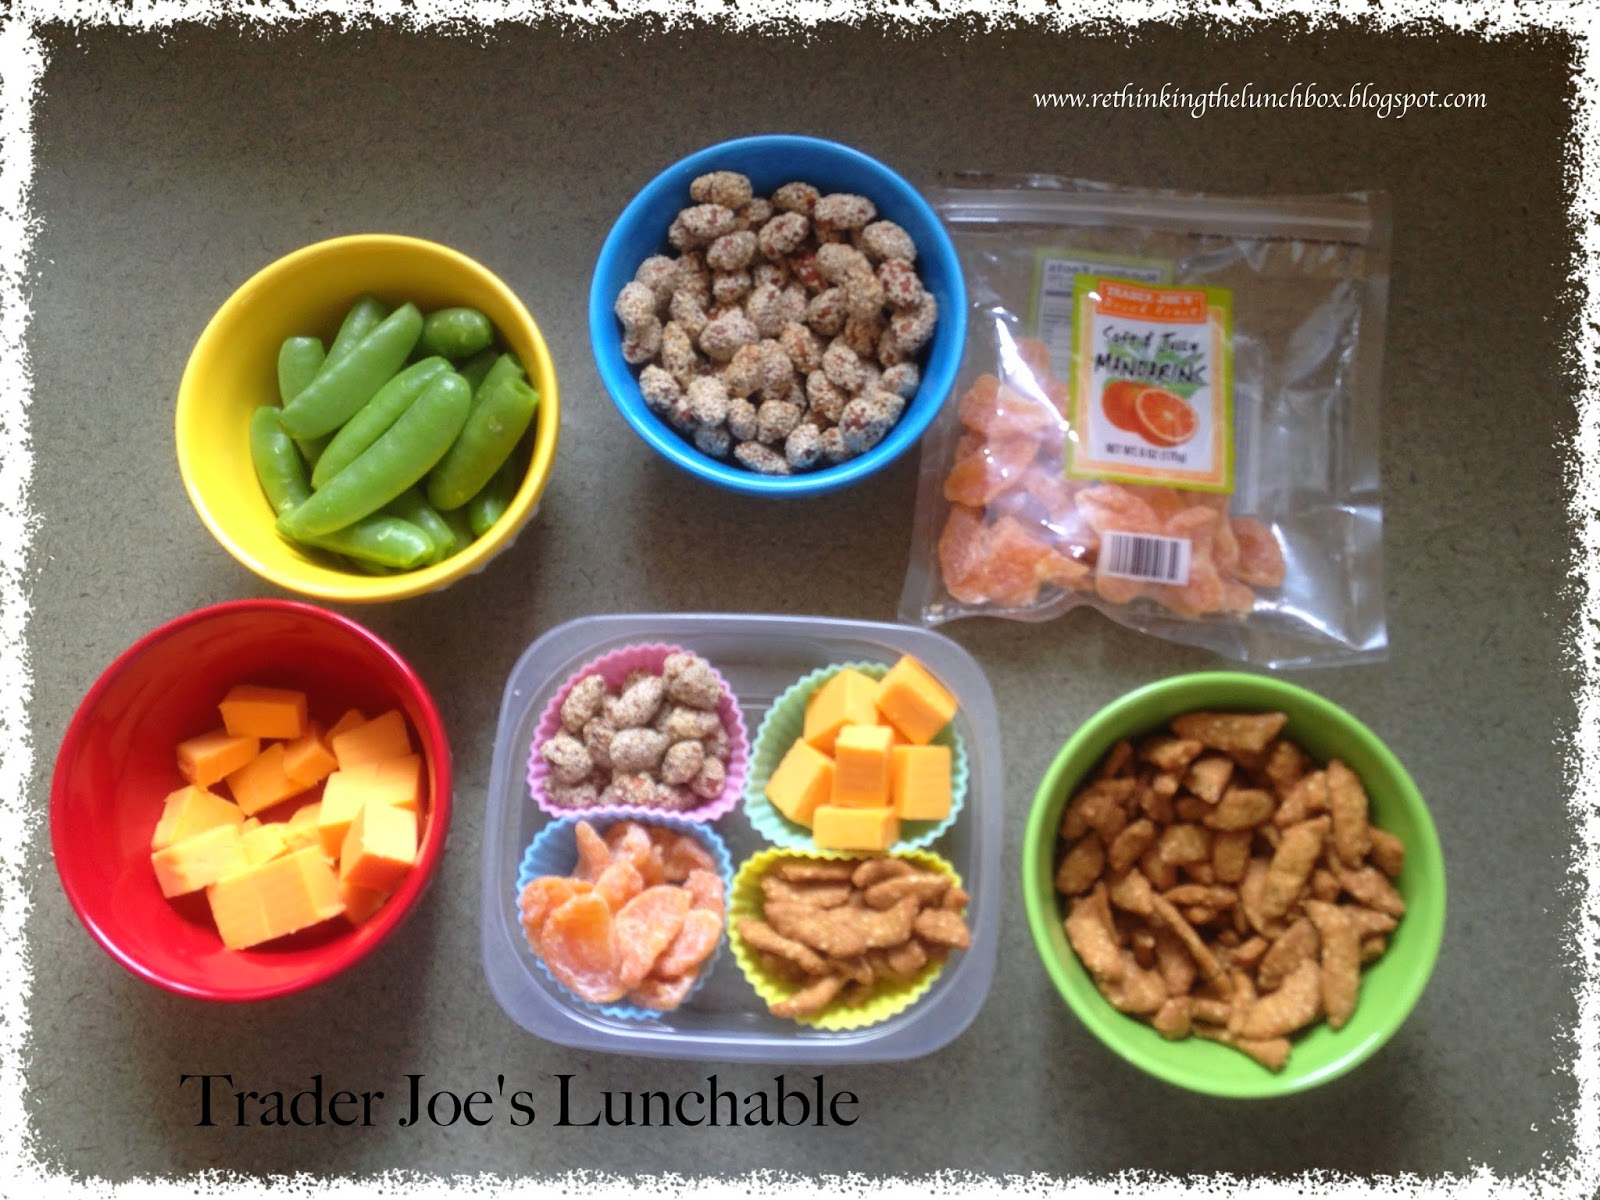
Trader Joe's Lunchable

It's back-to-school time for some; however, in our state, we've still got 2 weeks. But I decided that this lunchable is packable for school (for those who have started) or for the park (for those of us who are struggling through the last few weeks of summer).

One of my favorite stores is Trader Joe's. Not only are the employees friendly and knowledgeable, but the store is clean, well laid-out, and full of yummy things. My kids enjoying tagging along to look for the Octavia puppet (our store's mascot), which the employees hide in different places all over the store. Once they find her, the kids are given a sugar-free lollipop or a piece of fruit in exchange for Octavia's location. Today, she was on top of the mini chocolate biscotti.

In order to keep this lunchable simple, I popped into Trader Joe's to pick up a few remaining items to add to the other TJ's items I already had at home.


Here's my basic ingredients for today's lunch: Sesame Honey Almonds (protein). Extra sharp cheddar cheese (dairy). Sesame Sticks (grain). Sugar Snap Peas (veggie). Dried Mandarin Oranges (fruit).


After I trimmed the snappeas and cubed the cheese, I placed 4 silicone baking cups into a small, plastic container.


Cheese cubes go in one silicone cup. For aesthetic purposes, I made sure to NOT place the orange foods in the yellow cup. Orange and yellow would blend together too much, and I wanted to make them pop visually.


Diagonally across from the cheese, goes the other orange food - dried mandarin oranges.


Sesame sticks - my current craving - fill up another baking cup.


Sesame honey almonds, the protein component, complete the fourth cup.


Lastly, the deliciously crunchy snappeas get tucked in between the baking cups.


And voila! A Trader Joe's Lunchable that was easy, relatively affordable and involves no cooking!

Monday, August 18, 2014

Mason Jar Pasta Salad - How-To

Hey readers - so sorry that I couldn't post sooner. On Thursday, my family and I left to camp in a remote location - so remote that there was no cell tower or 3G for MILES. Twas very good to be unplugged, but unnerving when I realized that I hadn't posted as promised.
So please forgive my tardiness!


So here's how to make a Mason Jar Pasta Salad - step-by-step.


In a Mason Jar Pasta Salad, you can use any ingredients that you desire. It's quite adaptable to differing palates. Here's what I used: broccoli, whole wheat pasta, garbanzo beans, snappeas, grape tomatoes, baby carrots, green onions, mozzarella cheese, zucchini and Newman's Own Lite Caesar Dressing.

I began by prepping my ingredients. While the pasta boiled, I cut and chopped the veggies and cheese into bite-sized pieces. I blanched the broccoli florets, zucchini semi-circles and chopped baby carrots.


Next, mise-en-place - which means "everything in its place". I put my ingredients in order of layering. Remember when I told you last week that layering is a key to keeping the ingredients fresh and tasty? Well, that's what I did here. Plus, I wanted the layers of the colorful veggies to look lively.


First, I poured about 2 Tbs. of Newman's Own Lite Caesar dressing into the bottom of a quart mason jar. (This is one of my FAV salad dressings. SO much flavor!)


Colorful grape tomatoes begin to create the barrier between the salad dressing and the softer veggies, which will be added at the top of the jar.


Bite-sized snappeas top the grape tomatoes, adding a bit of crunch!


Bright orange baby carrot pieces add more color. (I blanched these pieces for 2-3 minutes to soften them up just a wee bit.)


A layer of broccoli florets add more green to this already colorful pasta salad. (I blanched these for 3-4 minutes to cut the raw broccoli taste. Be careful to not overcook!)


Garbanzo beans provide another nutritious layer, between layers of delicious, green vegetables.


Semi-circles of zucchini were blanched for 2-3 minutes, then shocked in ice cold water to stop the cooking process. After draining, these half coins were added on top of the garbanzo beans.


Chopped green onions for a flash of color and a burst of flavor.


Small cubes of mozzarella cheese formed the last layer of this delicious pasta salad.


Add the lid and screwtop, and you've got yourself a super nutritious meal once lunchtime rolls around. I simply cannot wait to make a bunch of these, and try them out all week!
I'll let you know when I do.

Plus, be on the look out for some posts about the camping meals we made this past weekend. I'll let you know what works and what didn't. :)