This is the last week of school for my kiddos - woohoo! And SuperBoy's kindergarten class is "camping in" during schooltime, complete with sleeping bags, flashlights and camping-themed activities.
In honor of his "Camp In", I created a Taste of Camping lunch.
Here's what I used to make this lunch - baked beans, canned corn, potato salad, hot dogs, marshmallows, chocolate bars and graham crackers.
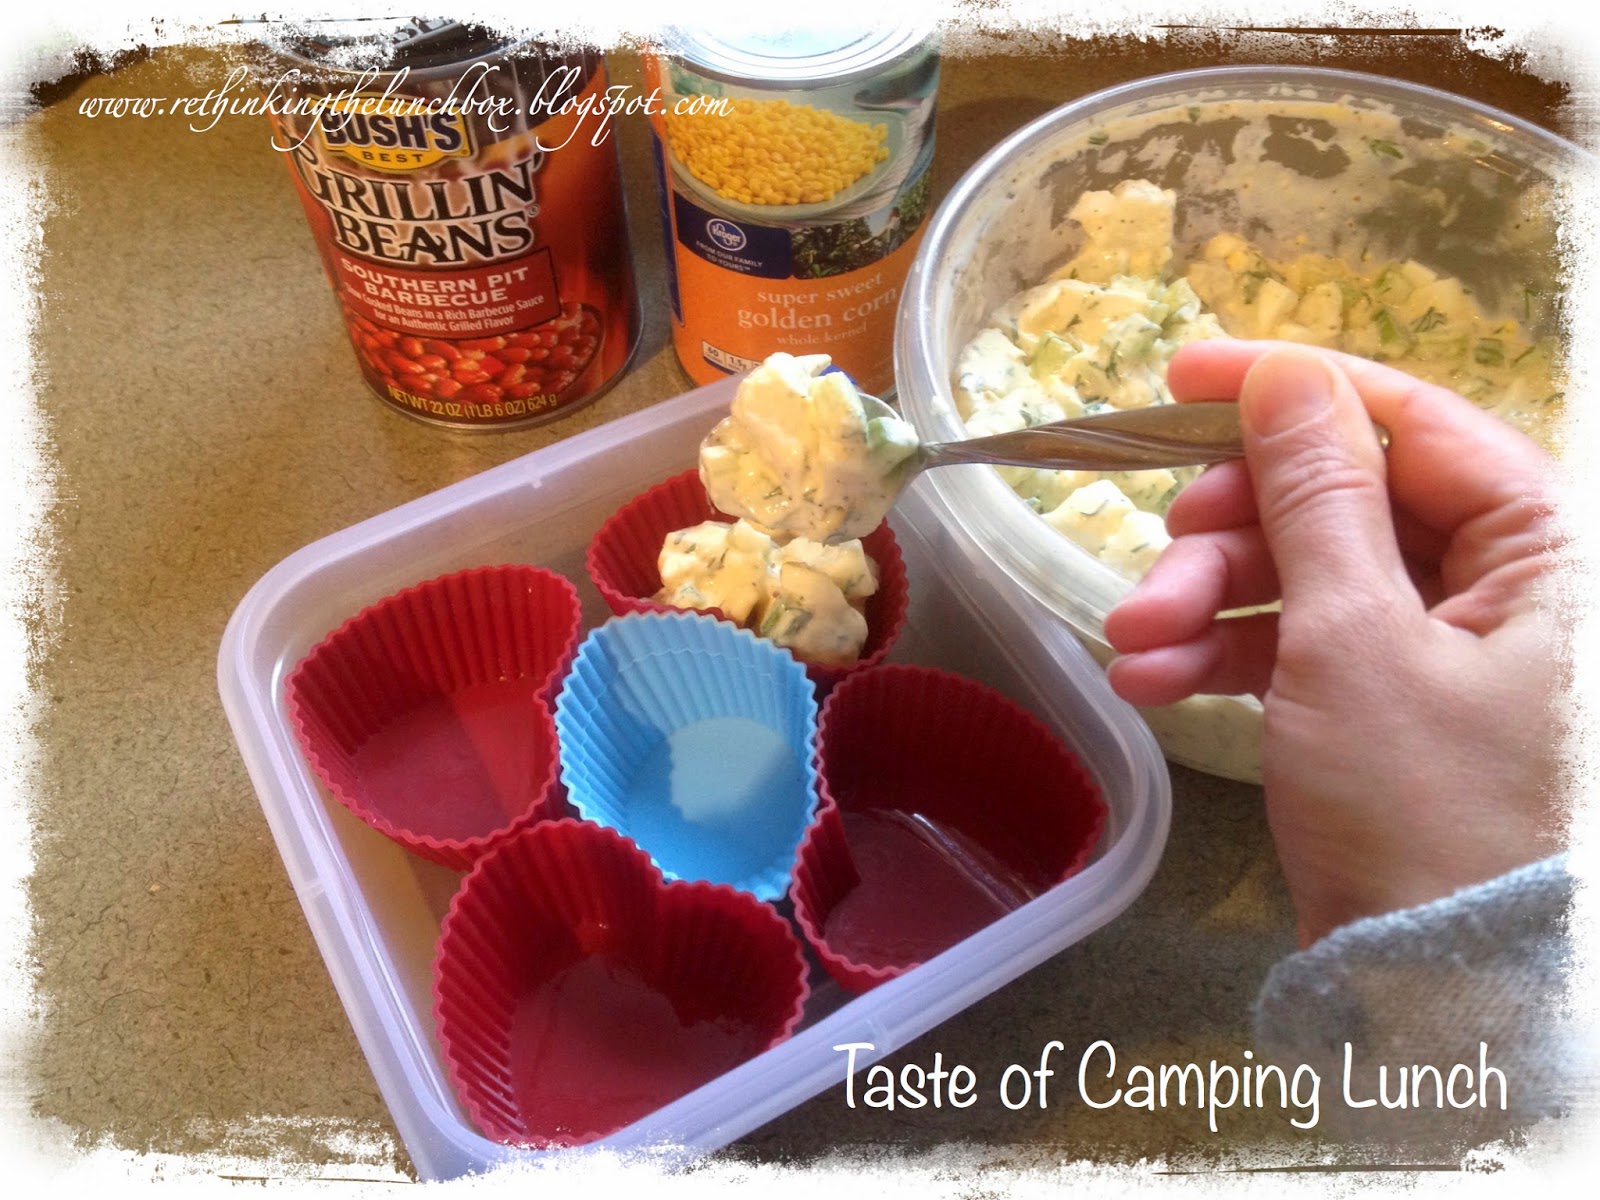
I placed 5 silicone baking cups into a square Lock-n-Lock container, filling one cup with potato salad.
Next, I zapped a few Jennie-O turkey hot dogs in the microwave to cook them. I sliced them into small, bite-sized chunks, and then ...
Added those hot dog bites into another baking cup.
I opened a can of corn and drained the liquid.
And spooned it into a third baking cup. I gave SuperBoy canned corn, because he lost his first tooth, making it difficult to eat corn-on-the-cob. However, LoveBug, who does have front teeth, received slices of corn-on-the-cob in her lunch.
Before adding baked beans to this Taste of Camping lunch, I drained them WELL with a slotted spoon. Baked beans are delicious (especially Bush's Grilling Beans!), but you don't want the juices to permeate the rest of the food, making your whole lunch to taste like baked beans!
After draining the baked beans, THEN I added them to the lunch.
I added a bit of delicious Heinz ketchup to condiment containers, which are the perfect size for dipping hot dog bites.
Now comes the part that SuperBoy was MOST looking forward to ... the S'more!
Here's how to make a small S'more in the microwave. I started off by using 1 graham cracker square (snapped in half), 1 large marshmallow, and 2 pieces of Hershey's chocolate.
(1) Using scissors, I cut a large marshmallow in half lengthwise.
(2) Then, I cut each half into half again, creating 4 long pieces.
(3) I placed the chocolate squares end to end on a graham cracker half.
(4) I topped the chocolate with 2 marshmallow pieces.
(5) Then I microwaved it for about 8 seconds. (not shown)
After removing from the plate from the microwave, I carefully topped the S'more creation with the other graham cracker half, and then I let it cool for a bit.
My husband and I tried one - scrumptious!
Lastly, I cut out a few hearts out of waxed paper, placing them on top of the baked beans, potato salad and canned corn. This should better secure the contents of each heart-shaped baking cup.
This is my toothless son's lunch, hence the canned corn.
And here is my daughter's lunch, complete with corn-on-the-cob slices.
Give it a try at home. It's super easy!
Lunch doesn't have to be boring, tasteless or challenging to make. Rethink YOUR Lunchbox.
Monday, June 16, 2014
Thursday, June 12, 2014
Shopping for Summer Snacks
On Monday, I talked about my new Smart Summer Snacking plan. The results are in ... it's going wonderfully! Wanna see the Before-and-After pics?
So, I planned to tell you all the in-and-outs of snack packing, but then I realized that it would make for a very looong post. Today, I will share with you HOW I go about finding the snacks on a weekly basis. Next week, I will share more of the in-and-outs, okay?
First, I look at the grocery store ads. I used to enjoy getting the actual newspaper, and circling the lowest produce deals in the flyer. However, now I love the apps! (If you have a smart phone, check the App Store for free apps of your local grocery stores.) Why do I love the apps? You can go into the weekly circular and search by category. I saved time by looking only under the "Produce" and "Snacks" categories. No more distractions. No more temptations to buy other items.
Next, I divided a piece a paper into the 3 categories, one for each of the nearby grocery stores. I glanced through each of the online weekly ads, and wrote down the low-priced produce and snacks. With my morning cup of coffee in hand, of course!
I looked over my list, circling some items and crossing out others. For instance, only SuperBoy really loves watermelon, so maybe I shouldn't buy a whole one, even if it IS a great deal. (Perhaps, I'll buy one for him this summer, because if he's home all day, he'll probably eat it all in 2-3 days' time.) On the other hand, the price on grapes ($1.28/pound) is a great deal, so I circled it as a possibility. With my list in hand, I went grocery shopping for snacks!
Here's what I purchased, at 2 different stores. The Cheez-it Scrabble crackers were on an unadvertised sale - $1.99 for 6 servings. That is $0.33/serving, and tons of word-making fun. Ritz crackers were selling $1.99, for 24 servings! Only $0.08 per serving!
The mini peppers were $1.98 for a pound; I bought 2 packages, since my family LOVES these little cuties. Mushrooms (only the kiddos like those!) sold for $1.48/package. Regarding carrots, my original intention was to buy baby carrots on sale for $1.98/2 pounds. Then, I looked over at the whole carrots, discovering a 2# package only cost $0.98! I'll take that one, thank-you-very-much!
In the clearance produce section, I found a few bananas that were perfectly good for eating. At $0.39/pound, those make a delicious, low-cost snack. Grapes cost $1.28/# - a good deal in our area. The first cherries of the season were a bit of a fruit splurge for us, at $3.88/pound. But I cannot wait to savor every nibble!
Planning out your produce and munchie snacks is not that hard. Look at the weekly ads - either in the flyer, or on the app. Choose which stores to shop at this week. Go and purchase your yummy snacks!
Next week, I'll talk about portion sizes and packaging, etc. This is SO fun for me to share with you; hopefully, these tips benefit you as well!
7 kiwis, 2 packages of celery, and 1 package of yellow pepper strips. Actually, as I am writing this post, my kids grabbed the celery portions to dip into peanut butter as an afternoon munchie. That leaves one lone package of yellow pepper strips. It's good thing that I went shopping!
So, I planned to tell you all the in-and-outs of snack packing, but then I realized that it would make for a very looong post. Today, I will share with you HOW I go about finding the snacks on a weekly basis. Next week, I will share more of the in-and-outs, okay?
The mini peppers were $1.98 for a pound; I bought 2 packages, since my family LOVES these little cuties. Mushrooms (only the kiddos like those!) sold for $1.48/package. Regarding carrots, my original intention was to buy baby carrots on sale for $1.98/2 pounds. Then, I looked over at the whole carrots, discovering a 2# package only cost $0.98! I'll take that one, thank-you-very-much!
In the clearance produce section, I found a few bananas that were perfectly good for eating. At $0.39/pound, those make a delicious, low-cost snack. Grapes cost $1.28/# - a good deal in our area. The first cherries of the season were a bit of a fruit splurge for us, at $3.88/pound. But I cannot wait to savor every nibble!
Planning out your produce and munchie snacks is not that hard. Look at the weekly ads - either in the flyer, or on the app. Choose which stores to shop at this week. Go and purchase your yummy snacks!
Next week, I'll talk about portion sizes and packaging, etc. This is SO fun for me to share with you; hopefully, these tips benefit you as well!
Monday, June 9, 2014
Smart Summer Snacking!
Summer is approaching, which means my kids are going to be out of school in less than 2 weeks. While I love the unstructuredness of summertime, my least favorite thing to hear (besides "I'm Boooooredddd!") is "I'm SO hungrrryyyy!" In the interest of my sanity and my kids' seemingly hollow legs, I devised a plan - a Smart Summer Snacking plan.
It all began a few days ago, when I found pretzels and Goldfish on sale; I bought a few packages. That evening, while my husband and I were catching up on Hawaii Five-0 episodes (Love that show!), I divided the fishies and pretzels into serving-size portions, pouring them into individual, snack-size Ziploc bags. (My husband loved this plan, because if there were any goldfish or pretzels leftover that didn't create a full serving size, I handed the remainder of the bag to him.)
Well, that just got me started, and I began cutting veggies and bagging them up. Next, out came the grapes, which also got divvied up into baggies. All while watching Hawaii Five-0 episodes.
The next day, I introduced my kids to my Smart Summer Snacking plan. In addition to normal meals (obviously), my kiddos are allowed to have one "snackie" of pretzels/goldfish/crackers each day; it's their decision which item they choose and when they want to eat it. Here's the stash of various goldfish and pretzels, sitting on our kitchen counter.
During the other "I'm-dying-of-hunger" times, they are free to help themselves to pre-packaged veggies or fruit, which are stored in the refrigerator. And can I just tell you? Their produce intake has skyrocketed over the past few days! They might eat me out of house-and-home, but hooray for healthy choices!
And you know what, my husband and I are eating healthier choices too! Besides, the kiddos have a few days of school left, and this pre-packaging gig makes throwing together their lunch a breeze! Try it!
On Thursday, I'm gonna talk more about this plan. Addressing a few concerns. Giving some tips and tricks. Presenting numerous delicious and EASY snack ideas. I'm pretty excited about this; hopefully, my excitement is infectious! See you on Thursday!
It all began a few days ago, when I found pretzels and Goldfish on sale; I bought a few packages. That evening, while my husband and I were catching up on Hawaii Five-0 episodes (Love that show!), I divided the fishies and pretzels into serving-size portions, pouring them into individual, snack-size Ziploc bags. (My husband loved this plan, because if there were any goldfish or pretzels leftover that didn't create a full serving size, I handed the remainder of the bag to him.)
Well, that just got me started, and I began cutting veggies and bagging them up. Next, out came the grapes, which also got divvied up into baggies. All while watching Hawaii Five-0 episodes.
The next day, I introduced my kids to my Smart Summer Snacking plan. In addition to normal meals (obviously), my kiddos are allowed to have one "snackie" of pretzels/goldfish/crackers each day; it's their decision which item they choose and when they want to eat it. Here's the stash of various goldfish and pretzels, sitting on our kitchen counter.
During the other "I'm-dying-of-hunger" times, they are free to help themselves to pre-packaged veggies or fruit, which are stored in the refrigerator. And can I just tell you? Their produce intake has skyrocketed over the past few days! They might eat me out of house-and-home, but hooray for healthy choices!
And you know what, my husband and I are eating healthier choices too! Besides, the kiddos have a few days of school left, and this pre-packaging gig makes throwing together their lunch a breeze! Try it!
On Thursday, I'm gonna talk more about this plan. Addressing a few concerns. Giving some tips and tricks. Presenting numerous delicious and EASY snack ideas. I'm pretty excited about this; hopefully, my excitement is infectious! See you on Thursday!
Thursday, June 5, 2014
Vegetable Cutters
Welcome to the world of Vegetable Cutters. These stainless steel cutters look like tall, miniature cookie cutters, but they can do more than cut out tiny cookies. The length of the vegetable cutters enables you to cut through a thick piece of cucumber, while the sturdiness of the stainless steel allows you to punch a shape through a hard slice of carrot.
These veggie cutters are a set of 6 animals.
This set of two veggie cutters features a maple leaf and a gingko biloba leaf.
Set of 2 cute flowers.
Simple heart and star vegetable cutters.
Here is a set of 6 small, flower shapes, complete with storage case.
These unique flowers also come in a larger size, complete with storage case.
An eight-piece set, featuring circles, stars and flowers. At $6.50 for the set at AllThingsForSale.com, this is a great deal!
An eleven-piece gives you numerous options. A speech bubble, heart, star, chef's hat, ring, candle, lips, mini circle, sunglasses. And two veggie cutters do double-duty! The butterfly cutter turns upside down to create a bowtie, and the mask shape also cuts out a mustache when rotated. How fun!
To use, simply cut a thick, lengthwise slice of vegetable, and press your veggie cutter into it to make the desired shape! You can use carrot, zucchini, bell pepper and cucumber! (Bonus: these also double as cutters for meat and cheese for making an adorable, homemade lunchable!)
Monday, June 2, 2014
Creative, Coffee-Themed Treats.
(Disclaimer: This creation is NOT healthy, unless you consider chocolate-covered cherries to be a fruit. This is just a creative flair of mine that I wanted to share with you!)
The past few weeks, my coffee-loving husband and his amazing team have been hard at work, and I wanted to bless them with some delicious yumminess. These treats are not healthy, but every once in a while, a bit of sugar is "needed", ya know?
Using leaves from my husband's coffee trees (I told you that he loves coffee!), I melted green Wilton candy melts and brushed the warm chocolate onto the back of the leaves. After 10 minutes or so in the refrigerator, the chocolate hardened. The I carefully peeled the actual leaf away from the candy, resulting in a perfectly-formed chocolate leaf.
The red, chocolate-covered cherries are Cherry Bings fromChukar Cherries, and they represent the coffee cherries, in which green coffee beans grow.
Also from Chukar Cherries are the mocha-dusted, chocolate-covered espresso beans, which represent roasted coffee beans.
The centerpiece is a simple coffee cup. The inside is a tiramsu cupcake, wrapped in marshmallow fondant. I topped half of the cupcakes with a tiramsu-flavored marscapone cheese, dusted with cocoa powder. The other half, including the one pictured above, are topped with Trader Joe's cookie butter. (If you've never had this, you simply MUST try it. Super delicious.)
To my amazing husband, I'm so proud of your hard work and dedication! Hope you and your team enjoyed the yumminess.
Thursday, May 29, 2014
Homegrown Lettuce in Recycled Milk Jugs
Last week, on my Letter R lunch post, I told you that I picked homegrown lettuce from our milk jug garden on our back deck. Today, I want to show you how to do it. It's pretty easy, and your kids will love watching the seeds sprout and grow. Plus, you can't beat the freshness and delicious taste!
Here's what you will need:
Several empty, rinsed-out milk jugs - I saved mine for a few weeks before this project.
An exacto knife.
Seeds - lettuce, spinach, salad-y type stuff.
Dirt - I used a potting soil mix.
Small shovel.
First step, turn the milk jug on its side, with the handle facing down. Using the exacto knife, an adult should cut off the side, which is now the top, since you laid the milk jug down. (Please know that I was careful, even though the pictures don't necessarily illustrate that. It is very hard to cut and take pictures at the same time!)
This is what it should look like when you are finished. Not professional nor perfect nor Pinterest-worthy, but it gets the job done. Ya know?
The next step is VERY important. Turn the milk jug upside down, and poke holes or X's in the bottom. This allows excess water to drain, preventing a build up of mildew within your container. Eww, we don't want that.
Now, flip your milk jug back over, and fill with dirt or potting soil. Kids will love to help with this step!
And the kids' most important job: adding the seeds, and covering them with dirt.
Give your newly planted seeds a shower. I mean it: really drench the container.
In a few weeks, your homegrown, milk-jug lettuce will be ready to be picked for a dinnertime side salad. Can't get much fresher than that!
Try it out at home, and send me pics of your gardening prowess!
Monday, May 26, 2014
"Thank you" on Memorial Day
To those who have paid the ultimate sacrifice for our freedom - thank you.
To their families who lost a loved one - my sincerest condolences and my deepest gratitude.
From those who fought in the Revolutionary War to gain our country's independence, to those who have fought to protect our freedom ever since - thank you.
We are the land of the free, because of the brave.
Subscribe to:
Posts (Atom)


.jpg)


